When Are Seedlings Ready to Transplant? Roots, True Leaves and Hardening Off
Leave a message
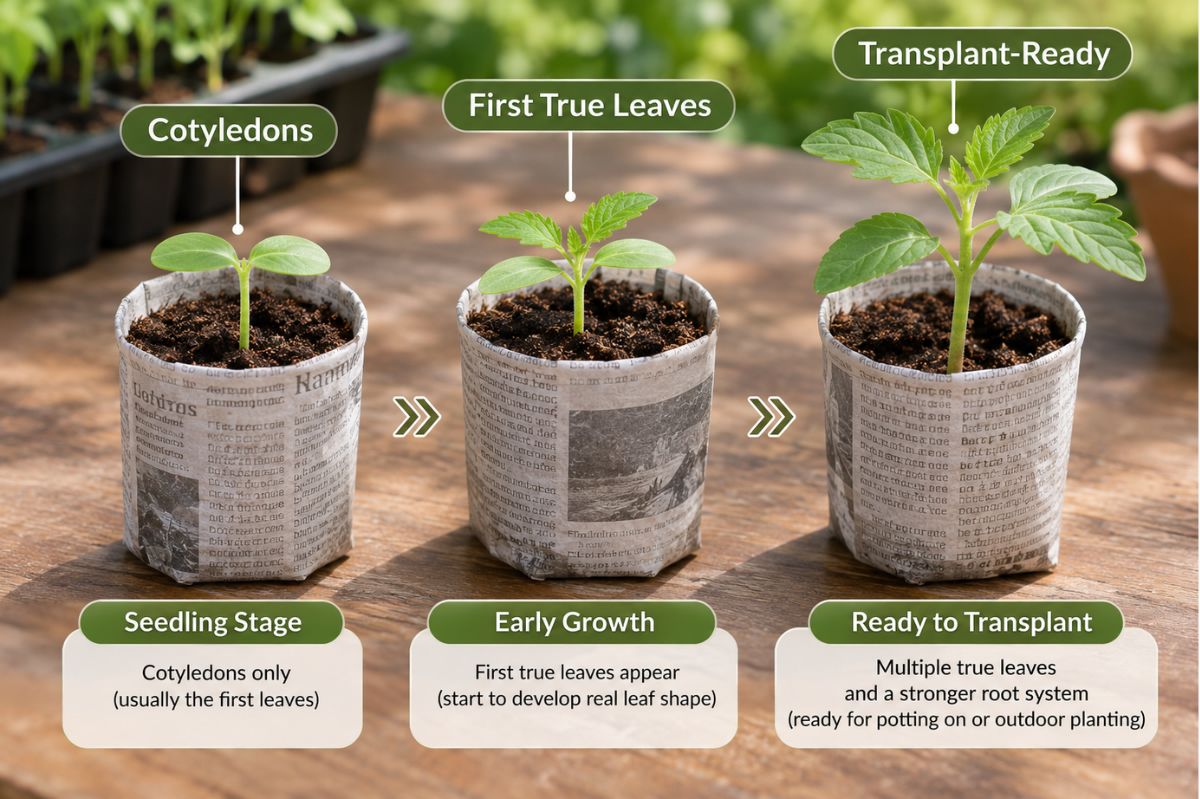
Seedlings are ready to transplant when their leaves, roots and growing conditions are ready for the next stage-not simply when they reach a certain age or height.
For potting up, the first true leaves are a useful starting signal. The seedling should be large enough to handle, and its roots should be developed enough to move with minimal damage.
For planting outdoors, use a stricter test. The plant should be sturdy, the root system should hold the plug or root ball together without being densely bound, the crop should be suitable for the expected weather and soil conditions, and indoor-grown seedlings should be hardened off gradually.
Quick answer: Look for one or more true leaves, a moist root ball that lifts largely intact, active but not tightly circling roots, a stem and canopy suited to the crop, and recovery from normal watering without repeated wilting. Before outdoor transplanting, acclimate the seedlings to sun, wind and temperature changes and check the crop's frost and soil requirements.
Potting Up and Planting Out Are Different Decisions
Gardeners often use "transplanting" for two operations.
| Operation | Destination | Typical trigger | Main risk |
|---|---|---|---|
| Pricking out or potting up | Communal seed flat or small cell to a larger individual container | First true leaves; seedlings large enough to handle; roots beginning to occupy the medium | Damaging a very young stem or tangled roots |
| Planting out | Indoor pot, plug or block to the garden or outdoor container | Sturdy growth, intact root ball, completed hardening off and suitable outdoor conditions | Sun, wind, temperature or moisture shock |
University of Maryland Extension describes the ideal potting-up stage as shortly after the first true leaves appear, before crowded seedlings develop intertwined roots. Outdoor planting is later and must account for the crop and environment.
This distinction prevents two common errors: keeping crowded seedlings in a germination tray for too long, and assuming that the appearance of one true leaf means a warm-season plant can immediately go into cold outdoor soil.
Cotyledons vs True Leaves
Cotyledons are the first seed leaves visible after germination. They are part of the embryo and often look simpler or rounder than the mature plant's foliage. True leaves appear afterward and begin to show the characteristic shape of the species.
The first true leaves indicate that the seedling has moved beyond its earliest emergence stage and is beginning active vegetative growth. This is why many Extension guides use the first one or two true leaves as the potting-up window.
Cotyledons alone do not prove outdoor readiness. A newly emerged seedling may still have a tiny, fragile root system and no tolerance of direct sun or wind. Likewise, waiting for a high number of leaves can be harmful if the plant is crowded in a very small cell. Use leaf stage together with root condition and container size.
Five Signs a Seedling Is Ready for the Next Container
1. True leaves are developing
One or two sets of true leaves are a practical signal for many seedlings being moved from a flat into individual containers. The correct stage can differ by crop and production system, so use crop instructions when available.
2. The seedling is large enough to handle safely
You should be able to lift the root zone with a dibber, spoon, plant label or plug-ejection method without pulling the stem. If a seedling must be pinched or dragged free, it may be too small, too dry or too entangled.
3. Roots hold the medium together
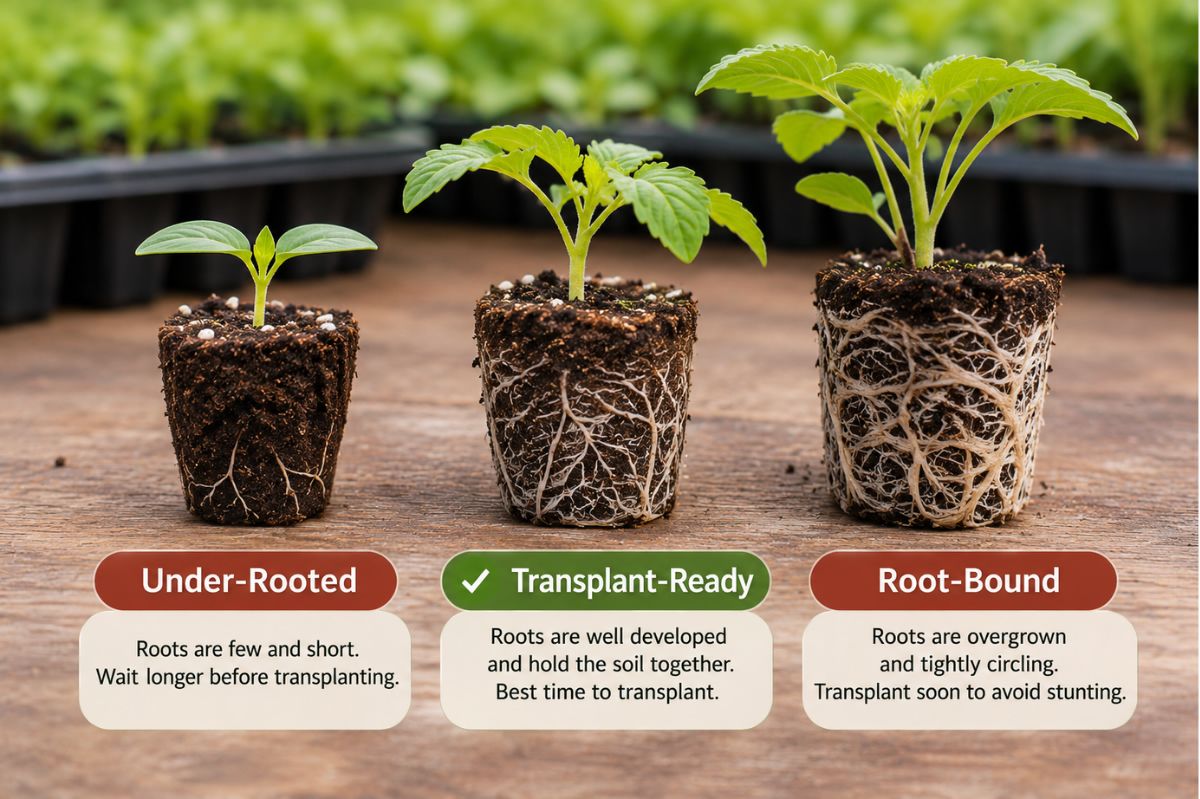
A transplantable plug should usually lift with most of its moist medium intact. The root system does not need to fill every visible space. A plug that falls apart may be under-rooted, overwatered, too dry or made from a medium that lacks structure.
4. The cell is becoming restrictive
Useful warning signs include:
- roots visible along several sides or at drainage openings;
- the cell drying much faster than before;
- leaves overlapping neighbouring seedlings;
- growth slowing despite suitable light, moisture and temperature; or
- repeated wilting between normal checks.
EDAR's Seed Tray Cell Size Guide explains why smaller cells create a narrower transplanting window.
5. The seedling is healthy enough to recover
Do not move a plant simply because its scheduled date has arrived. A transplant should be actively growing, correctly hydrated and free from obvious stem collapse, severe root damage or uncontrolled pest and disease symptoms.
What Should Seedling Roots Look Like?
Healthy transplant roots are generally light coloured, branched and distributed through the root ball. They should hold the medium while still having room to extend into the next container or garden soil.
The objective is not to produce the most roots possible inside the cell. A dense spiral of roots around the pot wall indicates that the transplant window has been missed or is closing. Roots emerging from one drainage hole do not automatically mean the plant is severely root-bound; inspect the complete root ball.
| Root-ball condition | Interpretation | Action |
|---|---|---|
| Medium falls away and few roots are visible | May be too young, too wet, too dry or poorly structured | Wait if the cell is not restrictive; correct moisture and retest |
| Roots lightly distributed and plug holds together | Good working transplant stage | Pot up or plant out if other conditions are ready |
| Many roots at sides, but root ball still opens slightly | Transplant promptly | Move to the next container or final site |
| Thick circling mat; little loose medium visible | Root-bound | Transplant carefully; follow crop-specific root management |
| Brown, soft roots or sour-smelling saturated medium | Possible root damage or poor aeration | Diagnose drainage and disease before transplanting |
Do not approve commercial tray performance from root appearance alone. Rooting is affected by crop, medium, irrigation, temperature, nutrition, cell geometry and holding time.
How to Tell Whether a Seedling Is Ready for Outdoor Planting
Use all five checks below.
Plant structure
The seedling should be reasonably compact and sturdy for its species. Tall, pale or floppy seedlings may need corrected light, spacing or temperature before outdoor exposure. EDAR's grow-light distance guide explains how poor distance and coverage can contribute to stretching.
Root-ball integrity
The plug or pot should move without collapsing, but roots should not be densely circling. Water the tray before transplanting so the root ball is moist, not dripping or powder-dry.
Container pressure
Rapid drying, crowded leaves and heavy root exit show that delay is becoming costly. If outdoor conditions are not ready, pot up into a larger container rather than leaving the plant root-bound.
Hardening-off progress
Indoor-grown seedlings must gradually experience brighter light, wind and outdoor temperature variation. A seedling moved directly from protected conditions to full sun can scorch or wilt even if its roots are well developed.
Crop and weather suitability
Check the seed packet or crop-specific guidance for frost sensitivity, preferred soil conditions, spacing and planting date. Some vegetables are commonly direct-sown because they respond poorly to root disturbance. A generic leaf-count rule cannot override crop requirements.
How to Harden Off Seedlings
Hardening off is the gradual acclimation of protected seedlings to outdoor sun, wind, lower humidity and changing temperatures.
Many Extension programs use about one to two weeks as a practical period, but weather and crop sensitivity can lengthen or interrupt the process. University of Minnesota Extension describes starting with a few hours in shade and protection from wind, then increasing outdoor time and direct sunlight gradually. University of Maryland similarly advises beginning one to two weeks before planting and avoiding severe wilting.
A practical hardening sequence
Days 1–2: sheltered shade
Place seedlings outdoors for a short period in bright shade on a mild, calm day. Protect them from strong wind and bring them back before temperatures fall outside the crop's safe range.
Days 3–4: longer outdoor exposure
Extend the time outside. Introduce gentle morning sun if plants remain turgid and leaves show no bleaching or dry patches.
Days 5–7: increase sun and air movement
Give the plants progressively more direct light and normal outdoor airflow. Continue checking small cells and porous pots because they may dry faster outside.
Final stage: approach planting conditions
If weather remains suitable, allow seedlings to spend most of the day outside and, for appropriate crops and temperatures, progress toward overnight exposure. Do not leave tender seedlings out simply to complete a calendar.
Hardening-off rules
- Do not begin with midday full sun.
- Do not use severe wilting as a hardening technique.
- Do not expose tender seedlings to frost or crop-inappropriate cold.
- Do not stop watering completely; check the root zone.
- Pause or step back during extreme wind, heat, cold or heavy rain.
- Keep labels with mixed crops because their tolerances differ.
- Inspect for pests before bringing trays back indoors.
Reducing watering frequency slightly may slow soft growth, but the medium should not be allowed to become dangerously dry. Hardening is controlled acclimation, not deliberate damage.
How to Transplant Seedlings Step by Step
1. Choose the destination and timing
For potting up, prepare a clean container with functional drainage and suitable growing medium. For outdoor planting, confirm crop spacing, frost risk, soil condition and the hardening-off stage.
2. Water before moving
Moisten the root ball several hours before transplanting if needed. It should hold together without releasing excess water. An extremely dry plug can crumble; a saturated plug can deform and lose aeration.
For controlled tray watering, see EDAR's bottom-watering seedlings guide.
3. Prepare the new hole first
Make the planting hole large enough for the root ball without folding or compressing the roots. When potting up, pre-moisten the new medium and create a hole before lifting the seedling.
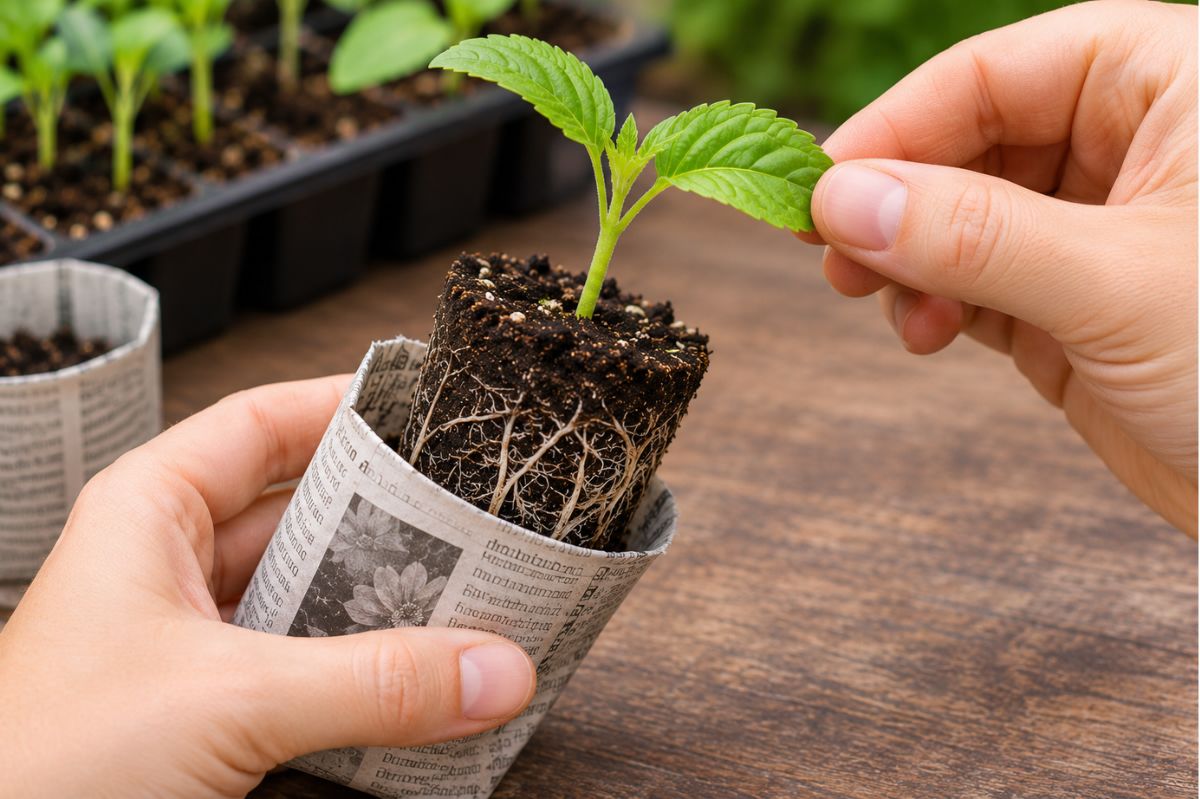
4. Release the seedling by supporting the root ball
Press or lift from beneath the cell where possible. Use a spoon, dibber or plant label for seedlings in an open flat. Do not pull on the stem.
If support from above is necessary, hold a leaf gently. A damaged leaf can often be replaced; a crushed stem or growing point may not recover.
5. Inspect, but do not over-handle, the roots
Confirm that the root ball is intact and not severely bound. Do not strip all medium from healthy roots or tease delicate plugs unnecessarily. Follow crop-specific advice if a dense root mat requires correction.
6. Set the correct planting depth
Most seedlings should be replanted near the depth at which they were growing. Do not bury leaves or the growing point. Tomatoes are a recognised exception that can form roots along buried stems, but that method should not be generalized to every crop.
7. Firm the surrounding medium
Close large air gaps without compressing the medium into a hard mass. The seedling should stand upright and the root ball should make contact with the surrounding soil or mix.
8. Water gently
Water the root zone to settle the medium. Allow drainage. Do not assume that visible surface wetness means the complete root ball is moist.
9. Reduce immediate stress
When planting outside, a cloudy, calm day or late afternoon can reduce initial sun and wind stress. Monitor moisture and weather closely during establishment. Protection products may help when used for the correct crop and conditions, but they do not make an unsuitable planting date safe.
Transplanting Soil Blocks and Biodegradable Pots
Soil blocks
Move a block when roots occupy it sufficiently for handling but before adjacent blocks become joined by roots. Support the whole block and place it into a compatible larger block, pot or planting hole. EDAR's soil block maker guide covers block formation and care.
Paper, fibre and other plantable pots
"Plantable" does not mean the container can be ignored. Before outdoor planting:
- remove tape, labels, staples or non-biodegradable fasteners;
- inspect whether the bottom remains restrictive;
- tear or open the base if needed for root contact;
- trim or bury the rim completely; and
- verify that the material is intended for direct planting.
University of Minnesota and University of Maryland Extension warn that an exposed organic-pot rim can wick moisture from the root zone. EDAR's biodegradable seed pots versus plastic trays guide compares the broader container trade-offs.
What If Seedlings Are Ready but the Weather Is Not?
Do not plant tender seedlings into unsuitable conditions merely because roots have filled the tray.
Options include:
- potting up into a slightly larger container;
- separating fast- and slow-growing crops;
- adjusting light height and spacing;
- moving plants to a protected cold frame when appropriate;
- delaying the final hardening stage during unsafe weather; or
- using a crop-appropriate protective cover after planting.
Potting up buys time but also increases bench space, medium use, watering demand and handling. For B2B kits and tray programs, the planned holding period should be defined before cell size is selected.
Common Transplanting Mistakes
1. Using plant height as the only rule
Height varies with crop and growing conditions. A tall seedling can be less ready than a shorter, compact plant with a cohesive root ball.
2. Confusing cotyledons with true leaves
Seed leaves are not the same as mature-form foliage. Use true leaves as one signal, not the only signal.
3. Waiting for a solid mass of roots
A plug should hold together, but extreme root density is not the target. Transplant before roots become tightly restricted.
4. Pulling seedlings by the stem
Stems and growing points are easily damaged. Lift beneath the roots and hold a leaf only when necessary.
5. Skipping hardening off
Indoor leaves are not prepared automatically for full sun, wind and temperature swings. Gradual exposure reduces avoidable stress.
6. Hardening too severely
Cold, drought or repeated wilting can stop growth and injure sensitive crops. Hardening should be progressive and reversible.
7. Planting every crop at the same depth
Most seedlings return to their original depth; exceptions such as tomatoes should not become a universal rule.
8. Leaving a biodegradable rim above the soil
An exposed rim can wick water away from the root zone. Remove or bury it.
9. Transplanting into an unprepared hole
Roots dry quickly while the gardener searches for tools or makes space. Prepare the destination before releasing the plug.
10. Following a calendar despite extreme weather
A planned date is not more important than frost, wind, soil condition or crop tolerance.
Troubleshooting After Transplanting
| Symptom | Possible causes | First checks |
|---|---|---|
| Mild temporary wilt | Root disturbance, brighter light or higher water demand | Root-zone moisture, shade and wind exposure |
| Severe wilt that does not recover | Dry root ball, broken stem, damaged roots, heat or wind | Planting contact, moisture through the full root ball and stem integrity |
| Bleached or pale leaf patches | Sunscald after insufficient hardening | Recent sunlight increase and exposure time |
| Seedling falls at the soil line | Stem damage, planting problem or disease | Stem base, sanitation and moisture |
| Growth stops for an extended period | Root injury, cold soil, root binding or unsuitable conditions | Root condition, soil temperature and crop requirements |
| Root ball dries while surrounding soil is moist | Exposed biodegradable rim or poor contact | Bury/remove rim and close air gaps |
| Leaves crowd but roots are still weak | High density, low light or excessive warmth | Spacing, grow-light setup and crop habit |
| Plug breaks during removal | Under-rooted or incorrect moisture; weak medium structure | Delay if possible and correct moisture before retrying |
Choosing Propagation Products for an Efficient Transplant Window
A good propagation system should make the transplant window visible and manageable. Evaluate:
- cell volume and depth for the expected crop and holding time;
- drainage openings and plug release;
- enough rigidity to lift a filled, wet tray;
- removable inserts or individual pots for mixed crops;
- clear covers that can be removed without disrupting lights;
- base trays that support watering and transport;
- compatible pots for an unplanned delay; and
- labels and instructions that distinguish germination, potting up, hardening off and planting out.
EDAR's 24 Cells Seed Starter Propagator Set lists a drainage hole in each cell and a transparent cover. Its current page does not establish a universal transplant age or crop schedule. EDAR's 24 Cells Self-Watering Seed Starting Kit uses a reservoir tray, support platform, growing tray, capillary matting and clear cover. Buyers should test transplant readiness with the complete system rather than infer it from the component list.
B2B Buyer Checklist for Seed-Starting and Transplant Systems
Retailers, importers and private-label buyers should test how a tray performs from sowing through transplant-not only how it looks when empty.
Define the intended use
- Record target crops and whether the kit is for germination only or a full indoor holding period.
- Define the expected pot-up or planting-out window.
- State whether seeds, growing medium, pots, cover, labels, base tray, capillary mat or light are included.
- Avoid printing a universal "transplant after X days" claim.
Cell and plug testing
- Measure cell count, usable depth, top and bottom dimensions and volume.
- Check drainage-hole consistency across centre, edge and corner cells.
- Test plug release at several root-development stages.
- Record whether plugs remain intact without becoming root-bound.
- Evaluate tray flex, bowing and lifting strength when wet.
- Test several compatible media rather than one ideal mix.
Mixed-crop and delay testing
- Grow crops with different germination speeds and transplant dates.
- Confirm whether inserts or pots can be removed individually.
- Test how the system handles a delayed outdoor planting date.
- Check whether larger compatible pots are part of the retail range.
- Assess label visibility after repeated watering and outdoor hardening.
Hardening and transport
- Check tray stability during movement indoors and outdoors.
- Test wind exposure in controlled conditions; do not market a standard tray as storm-safe.
- Evaluate UV exposure and outdoor use only when the material and test scope support such claims.
- Confirm drainage after rain and the ability to empty standing water.
- Test handles, rims and corners with a full wet load.
Instructions and claims
- Show cotyledons and true leaves accurately.
- Separate "pot up" from "plant outdoors."
- Explain how to inspect a root ball without pulling the stem.
- Include a gradual hardening-off sequence with weather cautions.
- Explain plantable-pot rim and base preparation.
- Substantiate material, recycled-content, biodegradability, UV, durability and certification claims before printing.
- Do not promise zero transplant shock or a guaranteed survival rate.
Packaging and retail communication
- Use real product photographs and the approved bill of materials.
- Include market-appropriate units, language, plug/adapter information where lights are included, barcode and warnings.
- Keep crop examples conditional; seed varieties and climates differ.
- Provide QR-linked educational content only after the destination URL is live and stable.
FAQ
Q: How many true leaves should seedlings have before transplanting?
A: One or two sets of true leaves are a useful stage for potting seedlings from a flat into individual containers. Outdoor planting usually happens later and also requires a sturdy plant, an intact root ball, hardening off and suitable crop-specific weather.
Q: Can seedlings be transplanted with only cotyledons?
A: Very young seedlings can sometimes be moved, but cotyledons alone are not the best general readiness signal. Waiting until the first true leaves usually makes handling and establishment more reliable, unless crowding or a production protocol requires earlier movement.
Q: Should roots be coming out of the drainage holes?
A: A few visible roots can show that the cell is being occupied. Heavy root growth through the holes, rapid drying and tight circling indicate that transplanting or potting up should not be delayed.
Q: What does a transplant-ready root ball look like?
A: It should remain mostly intact when moist, with light-coloured roots distributed through the medium. It should not fall apart immediately or consist mainly of a dense circling root mat.
Q: What is the difference between potting up and transplanting outdoors?
A: Potting up moves a seedling into a larger protected container, often after its first true leaves appear. Outdoor transplanting moves an established, hardened plant into garden conditions and requires suitable weather, soil and crop timing.
Q: How long should seedlings be hardened off?
A: About one to two weeks is a common practical range, but weather and crop sensitivity matter more than finishing a fixed calendar. Start in sheltered shade, increase time and sunlight gradually, and pause during unsafe conditions.
Q: Can I transplant seedlings without hardening them off?
A: Indoor-grown seedlings are likely to experience more sun, wind and temperature stress if moved outside abruptly. Gradual hardening is the safer default unless the plants have already been raised under comparable outdoor conditions.
Q: Should I water seedlings before transplanting?
A: Yes. A moist root ball usually holds together and protects roots better than a dry, crumbling plug. Avoid moving a saturated, collapsing plug and water again gently after planting.
Q: Should seedlings be planted deeper than they were in the tray?
A: Most seedlings should be set near their previous depth so leaves and the growing point remain above the soil. Tomatoes are a common exception that can root from buried stem tissue; do not apply that exception to every crop.
Q: What if seedlings are root-bound before it is safe to plant outside?
A: Pot them into a slightly larger container and continue providing suitable light, spacing, moisture and temperature. Do not leave them densely bound or plant tender crops outdoors solely because the original cell is full.
Q: How can transplant shock be reduced?
A: Harden seedlings gradually, water before moving, keep the root ball intact, handle plants by the root ball or a leaf rather than the stem, transplant during mild conditions, firm soil around roots and monitor moisture during establishment.
Conclusion
Seedling transplant readiness is a decision, not a date. True leaves show that early vegetative growth has begun; roots show whether the plant can move as an intact plug; the cell shows whether delay is becoming restrictive; and hardening off shows whether the plant can tolerate outdoor conditions.
For potting up, act while seedlings are still small and roots are manageable. For outdoor planting, add crop-specific weather, soil and frost requirements to the checklist. If plants are ready but the garden is not, provide more root space and maintain their quality rather than forcing the final move.
For B2B buyers, the key performance question is not how many cells a tray has. It is whether the complete system supports uniform germination, predictable plug release, a practical holding period, safe handling and clear instructions through the transplant stage.