

When Should You Remove a Humidity Dome from Seedlings? Germination, Airflow and Common Mistakes
Leave a message
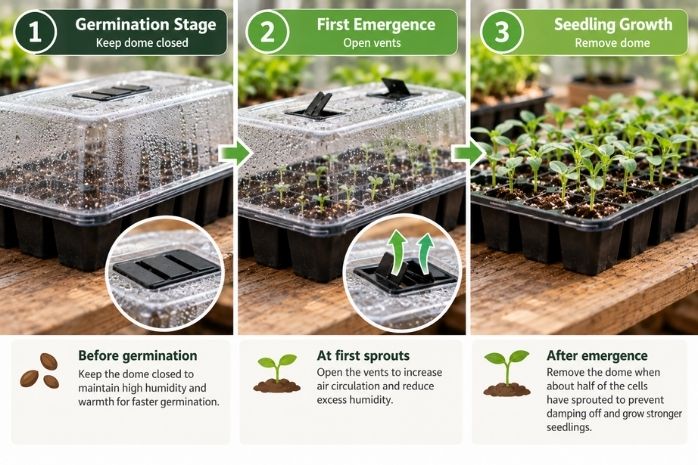
A humidity dome is most useful before and during germination, when seeds need consistent moisture and the growing medium can dry quickly. Once seedlings emerge, their priorities change. They need bright light, fresh air, suitable root-zone moisture and room to grow.
For most seed trays, start opening the vents as soon as seedlings begin to emerge. Remove the dome when a meaningful share of the tray has sprouted-often around half-rather than waiting for every seed. If seedlings are touching the lid, condensation is dripping, the medium stays saturated or stems are beginning to weaken, remove it sooner.
There is no single day count that works for every crop and room. The right timing depends on emergence, tray layout, growing medium, room humidity, temperature, light and whether the dome has adjustable vents.
What Does a Humidity Dome Do?
A clear humidity dome fits over a seed tray and reduces moisture loss from the growing medium. It can also help retain root-zone warmth when the tray is used with a suitable heat source. Learn how to use a seedling heat mat safely. This creates a more stable germination environment and reduces how often the surface needs to be watered.
The dome is not a substitute for drainage, correct sowing depth or a suitable seed-starting medium. It also does not mean the tray should stay waterlogged. Seeds need moisture, but roots and germinating seeds also need oxygen.
The University of New Hampshire Extension recommends clear plastic covers as one way to maintain consistent moisture during germination, while warning that covered trays must be kept out of direct sunlight because temperatures can rise high enough to damage seeds.
Think of the dome as a germination tool, not a permanent growing chamber for established seedlings.
When Should You Remove the Humidity Dome?
Use the following sequence instead of relying on a fixed number of days.
1. Open the vents when the first seedlings emerge
The first visible green growth signals that at least part of the tray has entered a new stage. Open adjustable vents or create a small air gap so humid air is no longer completely trapped.
At the same time, provide bright light appropriate for the crop. A closed dome does not correct insufficient light, and emerged seedlings can elongate quickly when they remain warm but poorly lit.
2. Remove the dome when emergence is established across the tray
For a tray containing one crop sown at the same time, a practical benchmark is to remove the cover when about half of the expected seedlings have emerged. The University of Maine Cooperative Extension advises taking off the plastic covering and moving the tray to supplemental light when about 50 percent of the seeds have begun to sprout.
This is a management benchmark, not a guarantee that the remaining seeds will fail. It balances the moisture needs of unsprouted seeds against the airflow and light needs of emerged seedlings.
3. Remove it immediately if the environment becomes excessively wet
Do not wait for a target percentage if:
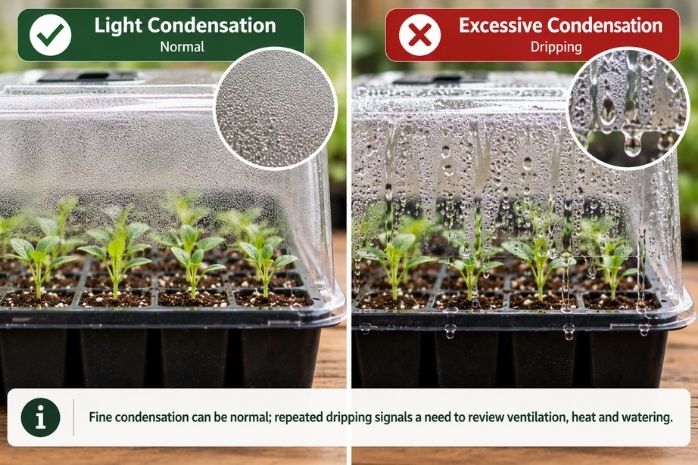
- large droplets repeatedly collect and drip from the lid;
- the growing medium remains saturated;
- water is standing in the base tray;
- white fuzzy growth or persistent surface algae appears;
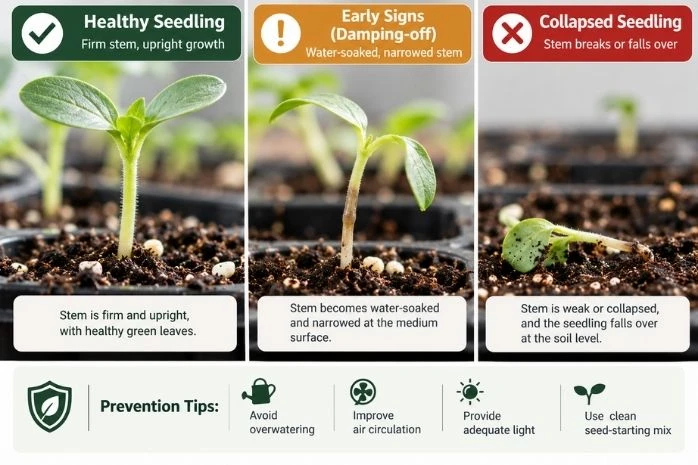
- seedlings have soft, discolored or narrowed stems at the soil line; or
- leaves and stems remain pressed against a wet cover.
These signs do not all prove disease, but they show that the closed environment is no longer being managed well. Increase airflow, drain excess water and review the watering method.
4. Never let seedlings remain crowded against the dome
The University of Minnesota Extension advises removing clear domes when seedlings are tall enough to touch them. Contact with a wet lid can bend growth and keep foliage continuously damp. In many indoor seed-starting systems, however, waiting until contact would be later than necessary. Treat "touching the lid" as an absolute latest point, not the default target.
Why Do Instructions Give Different Removal Times?
Humidity-dome advice varies because products and growing conditions vary.
A shallow, unvented cover over a densely sown tray creates a different environment from a tall dome with adjustable vents over individual cells. A heated tray in a cool room behaves differently from an unheated tray in a warm room. Fine, water-retentive media also stay wet longer than coarse, free-draining formulations.
Extension sources reflect this range. Illinois Extension advises removing plastic covers once plants begin germinating to reduce disease and excessive moisture. Minnesota Extension permits the dome to remain until seedlings approach the lid. Both principles can be used safely when the grower watches moisture, airflow, temperature and seedling development rather than applying one sentence without context.
For general home seed starting, the lower-risk approach is:
- Use the dome to stabilize moisture during germination.
- Vent at first emergence.
- Remove it when emergence is established across the tray or sooner if wetness becomes excessive.
- Move seedlings into strong light and begin monitoring moisture more frequently.
What If Only Some Seeds Have Sprouted?
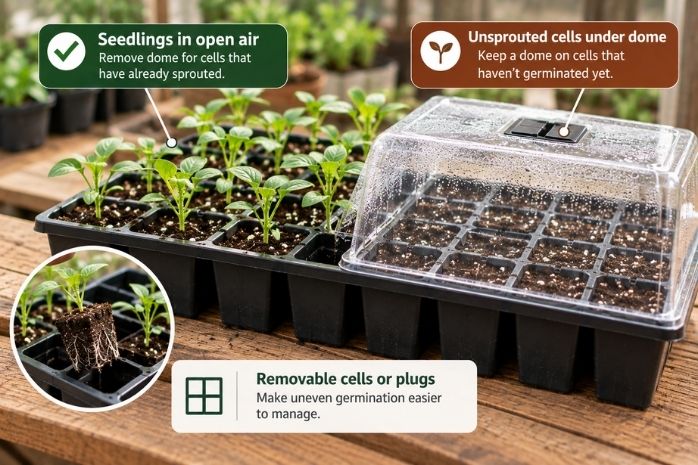
Uneven germination is common, especially when different crops share a tray or when cell temperature and moisture are not uniform. Do not keep vigorous seedlings under a sealed dome indefinitely while waiting for every late seed. Instead, use one of these options.
Separate cells or pots when possible
Modular inserts, removable pots or individual coir plugs make it easier to move emerged seedlings into open air while leaving unsprouted units covered. This is one reason system compatibility matters when comparing nursery trays and pots.
Vent the whole tray and monitor the unsprouted cells
If cells cannot be separated, open the vents or prop the cover slightly. Check unsprouted cells individually and add water only when the medium is beginning to lose moisture. Avoid flooding the whole tray simply because one area looks dry.
Group crops by germination behavior next time
Sow crops with similar germination temperature and timing in the same tray. Label every row or cell group. A mixed tray containing fast brassicas and slower peppers, for example, is harder to manage with one lid and one heat setting.
Poor or delayed emergence is not always a humidity problem. Seed age, sowing depth, temperature, light requirements, dormancy and seed-to-medium contact can all affect germination. Follow the seed supplier's instructions before increasing water or extending closed-dome time.
Should You Remove the Dome Gradually?
Many healthy vegetable and flower seedlings can move directly from a vented dome to normal indoor conditions once emergence is established. A long "hardening" process is not automatically required.
A short transition can help when:
- the dome was kept almost fully closed;
- the room air is unusually dry;
- the medium is in very small cells or plugs that dry rapidly;
- seedlings wilt soon after the cover is lifted; or
- a sensitive crop is being managed under a product-specific protocol.
Open the vents, then lift or remove the dome for progressively longer periods while checking the plants and medium. Do not use temporary wilting as a reason to restore permanently saturated conditions. First confirm that roots have access to evenly moist medium and that the tray is not overheated or exposed to strong direct sun.
This transition is different from outdoor hardening off. Hardening off prepares established seedlings for wind, direct sun and outdoor temperature swings before transplanting. Dome removal happens much earlier and mainly changes humidity, evaporation and air exchange.
What Should You Do After Removing the Dome?
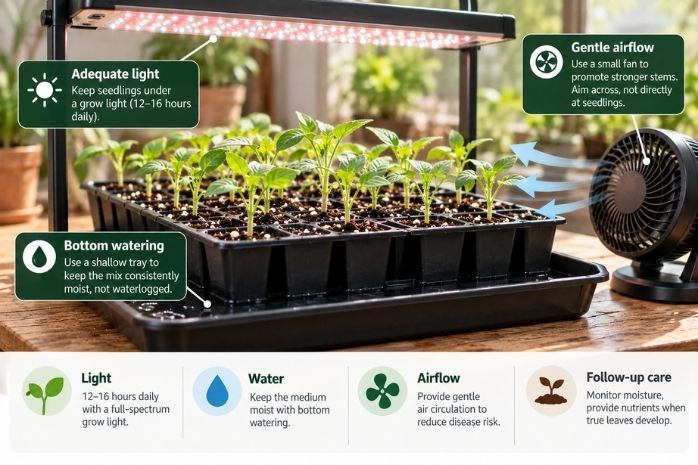
Provide bright light immediately
Newly emerged seedlings need bright light before they produce true leaves. Insufficient light is a major cause of long, weak growth. Place lights according to the equipment instructions and adjust them as the seedlings grow.
If a seed-starting product combines a cover with integrated lighting, confirm that the light height and dome-removal method can be adjusted independently. EDAR's verified Seed Tray Grow Light, for example, uses clear lids with adjustable vents; buyers should still test how the complete sample transitions from germination to open-air growth.
Expect the medium to dry faster
Removing the cover increases evaporation. Check the tray at least daily until you understand its new drying pattern. Water according to the medium, cell weight and plant condition rather than a rigid calendar.
Bottom watering can distribute moisture without repeatedly wetting tender stems, but do not leave the tray standing in water. Let the medium absorb what it needs, then drain the excess. The correct duration depends on cell size, medium and initial moisture.
Keep the medium moist, not waterlogged
Illinois Extension notes that waterlogged media may not contain enough oxygen for healthy roots. Newly emerged seedlings have small root systems and usually do not use as much water as larger plants. If the surface still looks wet, do not assume another watering is needed.
Growing-medium choice also changes the result. For a comparison of compressed plugs and loose propagation media, see Coco Coir Pellets vs Seed Starting Mix.
Use gentle air movement
Fresh air around the tray helps surfaces dry between waterings. If using a fan, aim for gentle circulation around the growing area rather than a strong stream directly at tiny seedlings. Strong airflow can dry edge cells quickly and cause uneven moisture across the tray.
Review bottom heat separately
A humidity dome and a heat mat do different jobs. Removing the dome does not automatically determine the correct root-zone temperature. Some crops benefit from warmth during germination but grow better at a cooler temperature after emergence. Follow crop and heat-mat instructions, measure the growing medium when precision matters, and avoid treating one temperature as universal.
Humidity Dome Problems and Solutions
| Symptom | Likely factor | Practical response |
|---|---|---|
| Heavy droplets fall from the lid | Excess condensation, limited venting or temperature swings | Open vents, drain standing water and review heat and watering |
| Seedlings collapse at the soil line | Possible damping off or severe water stress | Isolate affected cells, improve sanitation and moisture management; badly infected seedlings normally do not recover |
| Seedlings become tall and pale | Insufficient light, crowding or excess warmth | Move promptly to suitable light, thin when appropriate and review temperature |
| Seedlings wilt soon after dome removal | Dry medium, very low room humidity, weak roots or abrupt environmental change | Check root-zone moisture first; use a brief monitored transition if needed |
| Unsprouted cells dry while others are growing | Uneven tray exposure or mixed germination timing | Water cells individually, separate modules if possible and group similar crops next time |
| White growth or algae appears on the medium | Prolonged surface moisture, contamination or poor air exchange | Improve airflow, reduce persistent wetness and use clean trays and fresh medium |
| Seedlings touch the lid | Dome retained too long or insufficient headroom | Remove the cover and provide appropriate light and space |
The University of Minnesota Extension's damping-off guide identifies soft, water-soaked or threadlike stems, poor roots and collapse as warning signs. Prevention depends on clean equipment, fresh well-drained medium, suitable temperatures and moisture management. A dome alone does not cause every seedling disease, but a persistently wet, poorly ventilated setup increases the management risk.
How Retailers and Importers Should Evaluate Humidity Dome Systems
For B2B sourcing, do not compare propagators only by cell count or overall price. Evaluate the tray, insert, lid and watering method as one system.
Dome fit and dimensions
Request overall length, width and height, plus internal headroom above the filled cells. Check whether the lid clips, rests loosely or seals closely. Test fit across production samples, not only one showroom piece.
Vent design
Record the number, position and adjustment range of vents. Verify that the controls can be opened without lifting the entire cover and remain in the selected position during handling.
Visibility and condensation
The cover should allow users to inspect emergence without repeatedly opening the system. Test whether surface texture, molding marks or condensation make the seedlings difficult to see.
Tray drainage and base-tray capacity
Confirm the number and position of cell drainage holes, how excess water reaches the base, and whether the base tray can be emptied without spilling into the growing cells. A clear cover cannot compensate for poor drainage.
Material and reuse claims
Request the declared material for every component. If the product is marketed as reusable, test removal, cleaning, stacking and repeated vent operation. Avoid broad sustainability claims unless the material, recycled content, recycling route or reuse evidence is documented for the target market.
Component compatibility
Measure the tray footprint against retail shelves, heat mats, grow lights, capillary mats and transport cartons. EDAR's 24 Cells Self-Watering Seed Starting Kit is a verified example of a system combining a reservoir tray, support platform, growing tray, capillary matting and clear cover. The 24 Cells Seed Starter Propagator Set uses a different bundle with a clear adjustable lid, coir discs, labels, tools, spray bottle and gloves. These examples show why buyers must compare the complete bill of materials rather than the phrase "24-cell kit."
Instructions and packaging
User instructions should explain:
- how to moisten the medium before sowing;
- when to close, vent and remove the dome;
- how to drain excess water;
- when to move seedlings into bright light;
- how to clean reusable parts; and
- that crop-specific seed instructions take priority.
For samples, run a complete sowing trial. Record emergence uniformity, condensation, vent operation, edge-versus-center drying, lid clearance and package damage. Do not convert one successful crop trial into a universal germination claim.
FAQ
Q: Should I remove the humidity dome at the first sprout?
A: Open the vents at the first sprouts. For a uniform single-crop tray, the dome can usually be removed once emergence is established across a meaningful part of the tray, often around half. Remove it sooner if condensation is dripping, the medium is saturated or disease symptoms appear.
Q: Can I leave the humidity dome on until true leaves appear?
A: That is usually longer than necessary for ordinary seed starting. Cotyledons and newly emerged stems already need light and air exchange. True leaves are useful for later care decisions, but they are not the safest universal trigger for dome removal.
Q: What should I do if only one seed has sprouted?
A: Open the vents and monitor both the seedling and unsprouted cells. If possible, remove the sprouted pot or plug from under the dome. Otherwise, keep the medium in late cells moist without leaving the whole tray sealed and saturated.
Q: Do humidity dome vents stay open or closed during germination?
A: They may remain mostly closed at the beginning when moisture loss is rapid, provided the medium is not waterlogged and the tray is not overheating. Begin opening them at emergence and use condensation and medium moisture as feedback.
Q: Is condensation inside a humidity dome normal?
A: Some condensation is expected because the cover reduces moisture loss and the inner surface may be cooler than the air below it. Persistent large droplets and dripping indicate that ventilation, temperature or watering should be adjusted.
Q: Will removing the dome stop late seeds from germinating?
A: Not necessarily. Late seeds can still germinate if temperature and medium moisture remain suitable. Watch those cells more closely because the surface will dry faster without the dome. Seed viability, sowing depth and crop-specific dormancy can also affect timing.
Q: Should I use a fan after removing the dome?
A: Gentle air circulation can help, but avoid a strong stream directly on tender seedlings. Monitor edge cells because they may dry faster than the center of the tray.
Q: Is a humidity dome the same as a cover for cuttings?
A: No. Unrooted cuttings may need a different humidity-management protocol because they cannot yet replace water through an established root system. This article addresses seedlings germinated from seed; follow crop- and product-specific guidance for cuttings.
Q: Can a humidity dome prevent damping off?
A: It can reduce surface drying during germination, but it does not prevent damping off. Clean equipment, fresh well-drained medium, suitable temperature, moderate watering and timely airflow are more important. A persistently wet closed tray can increase disease risk.
Final Recommendation
Use a humidity dome to keep the growing medium consistently moist during germination. At the first emergence, begin venting and provide bright light. Remove the cover once a meaningful share of the tray has sprouted-often around half-or immediately when dripping condensation, saturation, disease symptoms or lid contact show that the closed environment is no longer suitable.
The safest rule is not "leave it on for a certain number of days." It is: watch the seedlings, moisture and air exchange, then change the environment as the crop moves from seed to seedling.


