Seedling Heat Mats: When to Use Them, When to Turn Them Off and Common Mistakes
Leave a message
A seedling heat mat provides gentle bottom heat beneath seed trays, pots or propagation cells. Its main job is to warm the growing medium during germination-not to heat an entire room or keep established seedlings permanently warm.
Heat can be useful when a sowing area is cool, the growing medium remains below the temperature preferred by the crop, or warm-season seeds germinate slowly and unevenly. It is not automatically beneficial for every seed. Some crops germinate well under ordinary indoor conditions, while excessive heat can dry small cells quickly or push the root zone above the crop's preferred range.
The most reliable approach is simple: check the crop requirement, measure the growing medium rather than guessing from room temperature, keep moisture and drainage under control, and remove most trays from bottom heat after germination.
What Does a Seedling Heat Mat Actually Do?
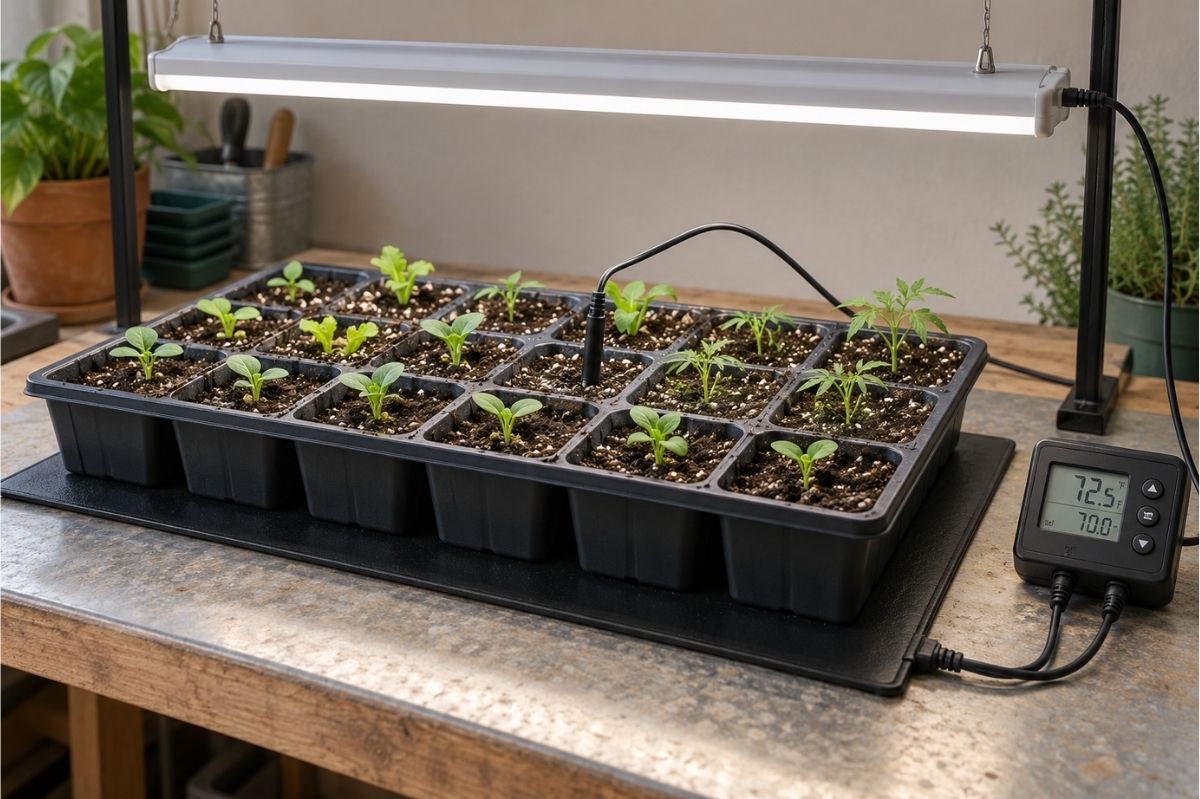
A seedling heat mat transfers heat upward into a tray and its growing medium. The temperature reached inside the cells depends on more than the mat itself. Room temperature, tray material, cell depth, water content, airflow, insulation and the use of a humidity dome all affect the result.
This distinction matters because air temperature and root-zone temperature are not always the same. The University of Minnesota Extension notes that potting mix in indoor containers can be cooler than the surrounding air and that bottom heat can support faster germination and healthy root development. Its guidance also recommends heating mats made specifically for seed starting rather than treating bottom heat as part of the light timer. See the University of Minnesota Extension seed-starting guide.
A heat mat does not replace any of the following:
- viable seed
- a clean, well-drained container
- suitable seed-starting medium
- continuous but not waterlogged moisture
- crop-appropriate sowing depth
- adequate light immediately after emergence
- ventilation and sensible hygiene
If one of these factors is wrong, extra heat may only make the problem develop faster.
Do You Need a Heat Mat for Seed Starting?
Use a heat mat when the root zone is cooler than the useful germination range for the seed being sown. It is particularly helpful for warm-season vegetables and flowers started in a cool room, basement or greenhouse bench.
Before switching it on, ask three questions:
- What temperature does this crop require? Check the seed packet, breeder information or a reliable crop guide. Different species-and sometimes different varieties-do not share one universal optimum.
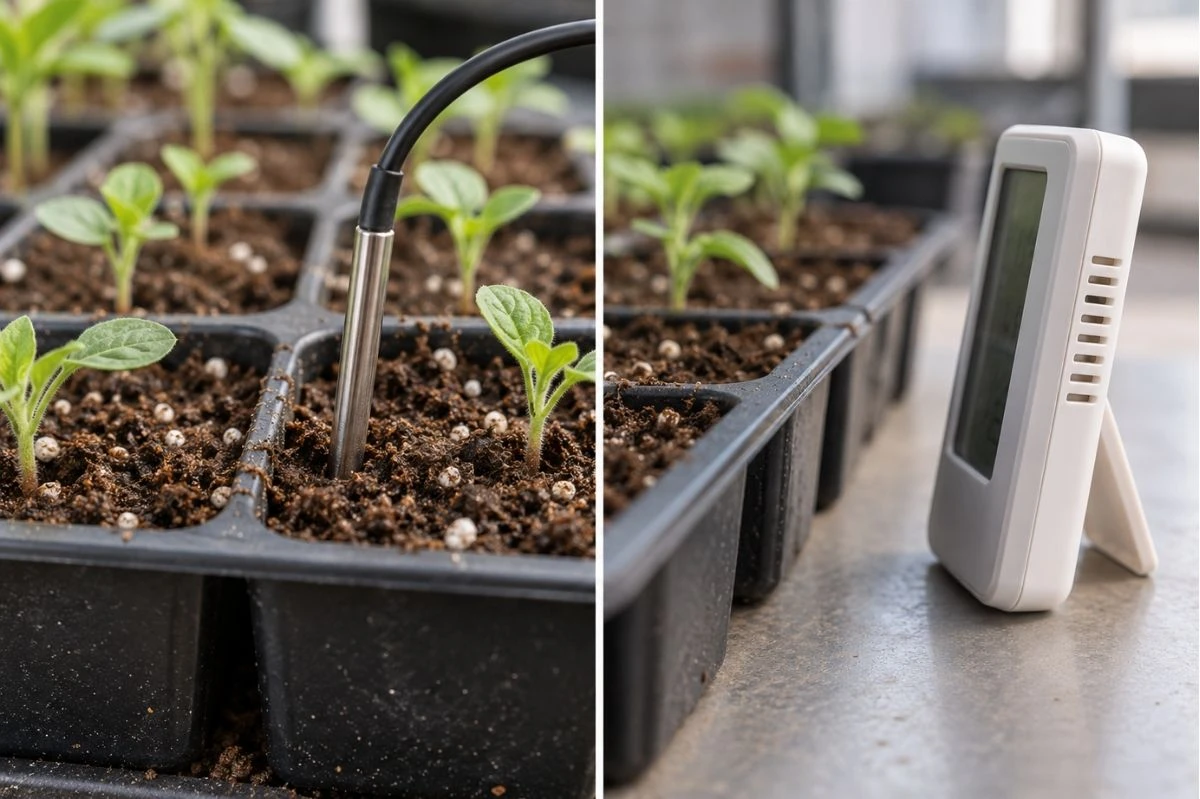
- What is the actual temperature inside the growing medium? Measure within a representative cell or pot. A comfortable room does not guarantee a suitable root-zone temperature.
- Is the unheated medium already warm enough? If it is, more heat may provide little benefit and can increase drying or overheating risk.
As a broad reference, the University of Maryland Extension states that a growing-medium temperature of about 65–75°F (18–24°C) is suitable for germinating many vegetable seeds. That is a general range, not a setting for every crop. Its updated indoor vegetable seed-starting guidance also notes that heat mats can speed germination and that seedlings generally benefit from somewhat cooler conditions afterward.
Seeds that often benefit from bottom heat
Warm-season crops such as peppers, eggplants and tomatoes are common candidates, especially when the sowing space is cool. Some herbs and ornamentals also respond well to a warmer medium. Always confirm the specific seed requirement before grouping crops on one mat.
Seeds that may not need it
Cool-season crops may germinate satisfactorily without added bottom heat. A mat may also be unnecessary in a warm propagation room or when sunlight and enclosed covers already raise tray temperatures. Heating every tray simply because a mat is available can create more variation, not more control.
How to Use a Seedling Heat Mat Step by Step
1. Group seeds by temperature requirement
Do not place warm-germinating and cool-germinating crops in the same tray if they require different conditions. Separate trays are easier to move off the mat when each crop emerges.
This is especially important for mixed kits. A single decorative kit may contain seeds with different germination speeds. If all cells share one tray and one heat source, early seedlings may remain heated while slower rows are still germinating.
2. Use a stable, dry and suitable surface
Place the mat on a flat surface as directed by its manufacturer. Keep electrical connections away from irrigation water, inspect the cable and surface for damage, and do not fold, puncture or cover the mat with unapproved insulating materials. Use only a product intended for plant propagation and follow the electrical and placement instructions supplied with that model.
3. Fill and moisten the tray evenly
Use a clean tray with drainage and a suitable propagation medium. Pre-moisten the medium so that dry pockets do not remain in the cells. It should be evenly moist, not saturated.
Cell size affects heat and moisture management. Small cells contain less water and can change temperature or dry faster than large cells. If tray format is still being selected, EDAR's Seed Tray Cell Size Guide explains why cell count, cell depth, volume and planned holding time must be considered together.
4. Position the tray and temperature probe correctly
Place the tray squarely over the active heating area. If a thermostat is used, position its probe according to the controller instructions-normally where it can represent the root-zone or growing-medium temperature, not suspended in the air above the tray.
Keep the probe in consistent contact and prevent it from being pulled out during watering or tray movement. A probe lying against the mat, sitting in an empty cell or exposed above the medium can produce a reading that does not represent the seed zone.
For a large tray, check more than one location with a separate thermometer during setup. Edges, corners and the center may not behave identically.
5. Set the target from the crop requirement
Do not automatically turn a controller to its maximum setting. Use the seed supplier's target or a reliable crop reference. Allow the filled tray time to stabilize, then confirm the growing-medium temperature independently.
A basic fixed-output mat may be adequate where room conditions are stable and the crop tolerates a broad range. A thermostat becomes more useful when:
- the room temperature changes between day and night
- the crop has a narrower target range
- multiple trays are used repeatedly
- the propagation area is cool
- overheating would be costly
- buyers need repeatable sample testing
6. Monitor moisture more often
Warm growing medium loses water faster. Check the full cell, not just the visible surface. A light mist can make the top look damp while the root zone remains dry.
Bottom watering may distribute moisture gently, but trays should not remain standing in water after the medium has absorbed what it needs. Drain excess water so that warming is not combined with persistent saturation.
7. Add strong light as soon as seedlings emerge
Bottom heat promotes germination; it does not provide light. Once shoots emerge, weak or distant light can quickly produce stretched seedlings. Move the tray into the planned lighting environment without delay.
EDAR's Seed Tray Grow Light illustrates an integrated tray, lid and LED format. Buyers assessing any combined system should test heat, moisture, ventilation and light as a complete setup rather than evaluating each component in isolation.
Should a Seedling Heat Mat Stay On Overnight?
During germination, the goal is usually a stable growing-medium temperature. If switching the mat off overnight causes the root zone to fall below the crop's useful range, a controlled mat may need to operate beyond daylight hours.
That does not mean every mat should run continuously at full output. The decision depends on the measured root-zone temperature and the product instructions. A thermostat-controlled system can cycle the heat source to maintain a target, while an uncontrolled mat responds more directly to changing room conditions.
Do not connect a heat mat to the grow-light timer unless the mat manufacturer or crop plan specifically calls for that schedule. Light and root-zone heat perform different functions.
Can You Use a Humidity Dome with a Heat Mat?
Yes, a clear dome can be used during germination to reduce moisture loss and help retain warmth, but the combination requires monitoring. Heat plus an enclosed cover can raise the tray temperature and keep the medium wet for longer than expected.
Keep a covered tray out of direct sunlight, check condensation and growing-medium moisture, and begin ventilation or dome removal as germination progresses. A dome should not be treated as a permanent chamber for emerged seedlings.
For the full transition process, see EDAR's guide on when to remove a humidity dome from seedlings.
When Should You Turn Off a Heat Mat for Seedlings?
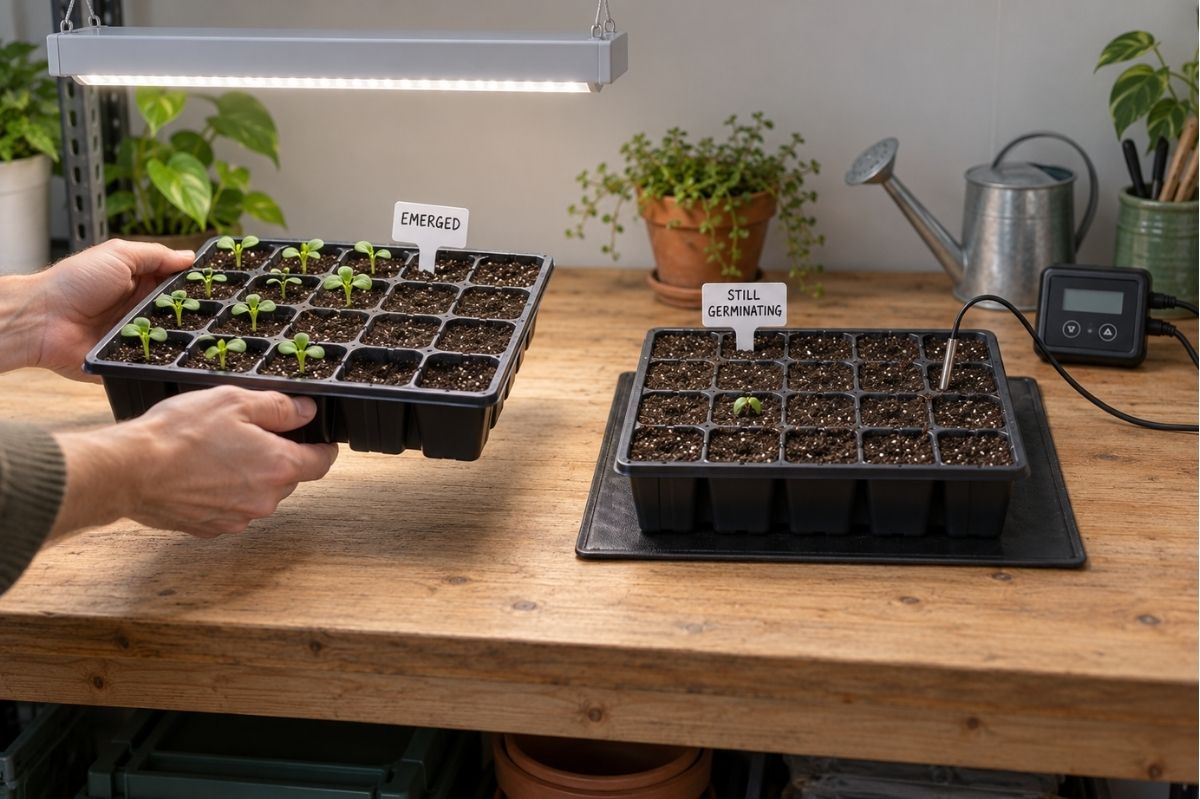
For most ordinary indoor seed-starting situations, remove the tray from bottom heat when a meaningful share of the seeds has germinated, then provide bright light and appropriate post-germination temperatures.
The University of Maine Cooperative Extension gives a practical benchmark: when about 50% of the seeds have begun to sprout, remove the tray from bottom heat, uncover it and move it to supplemental light. See its answer on when to remove bottom heat.
This is a useful operational rule, not an absolute biological threshold. Adjust it when:
- a seed supplier gives crop-specific instructions
- only part of a mixed tray has germinated
- a slow crop shares a tray with a fast crop
- the propagation room becomes unusually cold
- the mat is being used for a specialist propagation method
Whenever possible, sow crops with different emergence times in separate trays. This avoids forcing established seedlings to remain on heat while waiting for the last cells to sprout.
After the tray leaves the mat, continue monitoring moisture. The watering pattern may change because the medium will dry more slowly.
Seven Common Seedling Heat Mat Mistakes
1. Heating every seed type
More heat is not universally better. Compare the crop requirement with the actual unheated medium temperature before deciding.
2. Setting the controller from room temperature
The relevant measurement is the growing medium near the seed and developing roots. Air temperature alone can be misleading.
3. Placing the probe incorrectly
A loose probe can cause a controller to heat for too long or stop too early. Secure it in the representative position specified by the system manufacturer.
4. Leaving emerged seedlings on the mat
The best germination temperature is not necessarily the best seedling-growing temperature. Continued warmth, especially with insufficient light, can contribute to rapid, weak growth and faster drying.
5. Treating a heat mat as a grow light
Heat acts below the tray. Emerged seedlings still require adequate light intensity and duration. Plan the lighting location before sowing.
6. Ignoring cell size and tray construction
Thin trays, deep pots, small cells, inserts and capillary layers transfer and retain heat differently. Test the exact combination that will be sold or used.
7. Combining heat with excess water
Warm, constantly saturated medium is not a shortcut to germination. Use drainage, maintain moisture without waterlogging and empty residual water from solid base trays.
Troubleshooting a Seedling Heat Mat Setup
| Problem | Likely factors to check | Practical response |
|---|---|---|
| Seeds germinate slowly | Root zone still cool, old seed, crop dormancy requirement, poor moisture or sowing depth | Measure the medium; verify crop instructions and seed quality before increasing heat |
| Tray dries very quickly | Temperature too high, small cells, low humidity, strong airflow or uneven contact | Lower the target if appropriate, check more frequently and review tray-cell volume |
| Center is warm but edges are cool | Mat and tray footprints do not match, uneven surface or environmental drafts | Align the tray, test several cells and avoid overfilling beyond the active area |
| Medium is too hot | Controller setting too high, displaced probe, direct sun or added insulation | Disconnect safely, correct probe placement and follow product instructions before restarting |
| Seedlings are tall and weak | Heat continued after emergence, inadequate light or excessive spacing from the lamp | Remove bottom heat when appropriate and correct the lighting setup |
| Algae or persistent condensation | Medium remains wet, insufficient ventilation or dome retained too long | Improve drainage and airflow; follow the dome-removal process |
| Uneven emergence in one tray | Mixed crops, uneven sowing, nonuniform moisture, temperature variation or variable seed quality | Separate future sowings by crop and test several tray positions |
How to Choose a Seedling Heat Mat for Retail or Wholesale Programs
Importers, garden centers and private-label buyers should compare systems, not just nominal mat size and unit price.
Electrical and market compliance
Confirm the plug type, rated voltage and frequency for the destination market. Request the applicable test reports, certification evidence, labeling and instructions for the exact model-not a similar product. Claims such as waterproof or water-resistant must match verified product documentation and intended use.
Mat and tray compatibility
Compare usable heated area with the external footprint of the intended tray. A mat that fits one nominal "standard tray" may not fit another supplier's product. Check whether cables, raised tray feet or drainage features prevent even placement.
Temperature control
Clarify whether the product is fixed-output, manually adjustable or thermostat-controlled. For a controller, review probe type, setpoint range, displayed units, control tolerance, alarm behavior and what happens after a power interruption.
Construction and durability
Assess surface sealing, edge construction, strain relief, cable length, flexibility, storage instructions and resistance to normal propagation-area cleaning. Sample testing should include repeated heating cycles with the intended tray system.
Packaging and instructions
Retail packaging should explain that the product warms the root zone, that crop needs vary, and that users must follow electrical and moisture precautions. Include setup diagrams, controller instructions where relevant, troubleshooting and disposal information required by the target market.
Complete-kit performance
When a heat mat is bundled with a tray, dome, capillary mat or grow light, test the finished configuration. Key questions include:
- Does the mat match the tray footprint?
- Can the probe be placed securely?
- Is drainage water kept away from electrical connections?
- Does the dome cause excessive heat accumulation?
- Can early-germinating cells be moved away from heat?
- Does the packaging state when to transition to light and cooler conditions?
Explore EDAR's Grow Your Own range and Growing Media range when planning compatible propagation assortments. Specifications, materials, packaging and compliance documents should always be confirmed for the exact product under consideration.
FAQ
Q: What temperature should I set a seedling heat mat to?
A: Use the target recommended for the specific crop and measure the growing medium near the seed zone. Do not assume one temperature suits all seeds. A general vegetable-seed range can help with initial planning, but crop-specific instructions should take priority.
Q: Do seedlings need a heat mat after they sprout?
A: Usually not for ordinary indoor vegetable and flower propagation. Bottom heat is primarily a germination tool. Many seedlings benefit from cooler growing conditions after emergence, together with strong light and appropriate moisture.
Q: Should I turn a seedling heat mat off at night?
A: Base the decision on root-zone temperature, not the light schedule alone. If the growing medium falls below the crop's germination requirement overnight, controlled heat may still be useful. Follow the mat and thermostat instructions.
Q: Can a heat mat be too hot for seeds?
A: Yes. Excessive root-zone temperature can reduce germination for some crops and accelerate water loss. Use crop-specific guidance, check probe position and independently verify the growing-medium temperature.
Q: Where should a heat mat thermostat probe go?
A: Place it where it represents the root-zone or growing-medium temperature, following the controller manufacturer's instructions. Do not let it rest in the air, against the heating surface or in an unrepresentative empty cell.
Q: Can a heat mat cause damping off?
A: A heat mat is not a disease treatment. Problems are more likely when susceptible seedlings, contaminated materials, poor airflow and persistently wet medium occur together. Manage sanitation, drainage, moisture, temperature and ventilation as a complete system.
Q: Can I put a heat mat directly under a plastic seed tray?
A: Only if the mat and tray manufacturers permit that arrangement. Use a stable surface, keep connections dry, inspect the mat for damage and follow the supplied placement instructions.
Q: Is a thermostat necessary for a seedling heat mat?
A: Not every simple setup requires one, but a thermostat offers better control when ambient temperatures fluctuate, crop requirements are narrow or repeatable commercial testing is important. Even with a thermostat, verify the growing-medium temperature independently during setup.
Final Takeaway
A seedling heat mat is most useful when it corrects a measured root-zone temperature problem. Select crops with compatible needs, monitor the medium, manage moisture carefully and move emerged seedlings into bright light and generally cooler growing conditions.
For most home propagation, the decision is not "Should every tray be heated?" but "Does this crop, in this tray, in this room, need additional bottom heat?" That question leads to safer, more consistent germination and better product selection for both gardeners and professional buyers.